Remade 2011 Star Wars Advent Calendar – Day 1

It’s December, which means it’s time to start opening those LEGO Advent Calendars. (unless, of course, you couldn’t help but tear it open the moment you got it, and seeing as it’s LEGO, I wouldn’t blame you.)

However, you know me – never satisfied with what TLG produces for their sets. Their Advent Calendars are nice for children, but we need something bigger. Better. With that in mind, I decided to take up the challenge of rebuilding the Star Wars advent calendar, one model a day, every day from December 1st to December 24th. These models are built in LDD, but I used Bricklink and Peeron for reference with some pieces I wasn’t familiar with, so they should be build-able with physical bricks. (should be, because I’m still no Aanchir) No floating parts are used; the models use only legal LDD connections.

So, without further ado, Day 1 of the 2011 Bricdoctor-ian Star Wars Advent Calendar:

And, because Christmas is about giving, you can download the LXF file on Eurobricks.

Bricdocton Outpost

Bricdocton Outpost
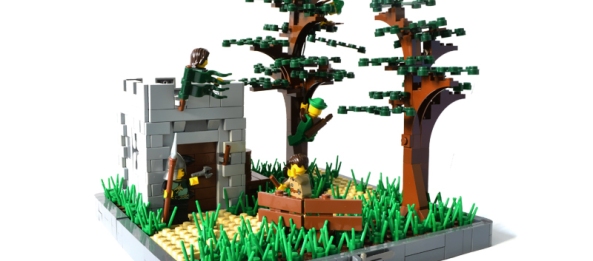
On an island that prides itself on self-reliance, what little stone is available is used towards the maintenance and expansion of Bricdocton Castle, so outposts usually consist of a short tower to provide protection for Avalonian men. The indigenous Forestmen keep watch from the nearest handy tree.

Bricdocton Outpost
Each road and outpost is carefully placed to allow the road to be surrounded on both sides by trees, ensuring that the Forestmen can easily move stealthily from outpost to outpost and rain arrows down on enemies from relative safety.

Bricdocton Outpost
Every outpost includes a small shed at the back, used for storing provisions.

Bricdocton Outpost
The Avalonian soldiers who are given outpost duty aren’t even close to being expert archers, but the outposts have been constructed with arrow loops to allow Forestmen to position themselves inside the fortification if necessary.

Bricdocton Outpost - Guard
With the establishment of outposts along the roads between the villages and the forest, peasants can now safely travel between the two halves of the island.

Bricdocton Outpost  - Commander
The guardhouse isn’t tall enough to be a useful watchtower, but it’s top level is a fairly safe place for the commander to survey his surroundings.

Bricdocton Outpost - Forestman
Forestmen keeping watch from the trees regularly come down from their posts when they aren’t on duty to enjoy a meal or a game with the Avalonian soldiers.

Bricdocton Outpost - Lookout
Thanks to the diplomacy and ancestry of Bartholomew Docken, eighth Lord of Bricdocton, what was once a constant conflict between peasants and Forestmen is now a relationship in which the Forestmen happily assume the lookout duties at each outpost.


Built for the Watchtower Challenge of the Eurobricks Castle Community Build. I was going to go for a traditional stone watchtower, but the technique I use for the walls used up too many tiles and I got stuck at this height. Then I tried a tree-based watchtower for the Forestmen, but maydayartist had already made an excellent one of those that I knew I didn’t have enough leaf pieces to come close to. So I combined the two ideas into a sort of hybrid outpost, with the Forestmen in the trees doing the watching and the Avalonian soldiers manning a short guardhouse.

Finished November 2011.

Trebuchet Emplacement

Trebuchet Emplacement
Despite the introduction of crude gunpowder-based artillery by rival guilds, the mainstay of the Avalonian army’s arsenal of siege engines remains the reliable trebuchet.

Trebuchet Emplacement
Built for the Guild of Avalonia as part of the Castle Community Build on Eurobricks, to obtain the title of Siege Master. It is a bit on the small side, but I wanted it to fit on the 24×24 base. This is one of the smaller support trebuchets, which would be used to take out men on the walls or lob small bombs and the like into enemy fortifications, as opposed to actually knocking down walls. Yes, it moves. No, it doesn’t shoot. I went for looks instead of functionality, and the counterweight isn’t heavy enough to generate the amount of force fast enough to whip the sling around, and if it was, I doubt the frame would hold it up.

Trebuchet Emplacement - Pikeman
Pikemen are positioned near the trebuchets to guard against an enemy cavalry strike.

Trebuchet Emplacement - Commander
The commander of the emplacement waits while his crew prepares for the next shot.

Trebuchet Emplacement - Engineer
While his peasant assistant helps him hold down the arm, the master engineer loads a stone into the sling.

The Outpost, 1700s

The Outpost, 1700s
I acquired one of the newer Redcoat shakos at the BaM bar a couple months ago, but until now I’d never had a use for it. I don’t own any Redcoat torsos, so I decided I’d use a Crusader torso. A later soldier of the faction. From there, I decided to do a ‘part 2’ version of my MOC, The Outpost .

The SNOT wall technique I first saw used by Dan Church, and the cannon was inspired by SlyOwl.

The Outpost, 1700s - Back
I debated between making the lower level a storage area or a prison with a pirate in it. In the end, I opted to use the latter to continue the theme from my Castle version of the MOC of a peaceful scene with one minifig.

The Outpost, 1700s - Cannon
I love this thing. Really happy with how it turned out. I always thought that TLG’s cannon were too big. Plus the black head-black fez combo worked beautifully here.

The Outpost, 1700s - Soldier
Originally I was going to have this guy holding his musket pointed up to the sky in a typical guard’s pose, but I wanted to try out my flex tubing arm technique in conjunction with a musket. And it’s another connection between this and the Castle version. (where the guard was aiming a crossbow over the wall.

The Outpost, 1700s - Bird
I always love including brick-built birds. They always look better than the prefab ones, too me. I also tried to work more on my rockwork here. I always have trouble with that. The piece of grass is the perfect touch of green here, if I do say so myself.

The Outpost, 1700s - Crates
I knew I wanted to have a lot of detail back here, but once I decided it would be a storage area, I went with all-brown items. I think it’s a great addition of detailing that makes the scene more realistic, but being in one color, it blends nicely into the wooden portions of the outpost itself, allowing viewers to concentrate on the soldier and cannon. (which, of course, are the focal points of the MOC)

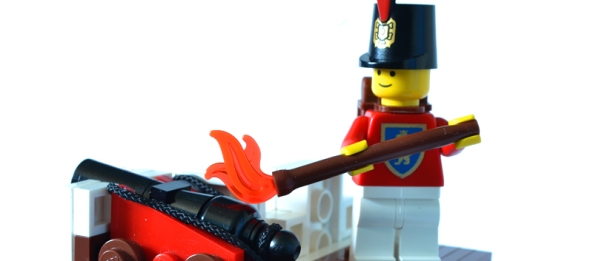
Fire in the hole!
Fire in the hole!
I just had to say it.
More flex tubing comes into play here. Stuffing the flame piece into the end looks a lot better that the 4L bar and telescope combo that TLG uses, I think.

AT-ST

AT-ST
The AT-ST’s always been one of my favorites. The overall design is just awesome. Building mine, I went with my usual sizing, with emphasis on high amount of detail and low amount of studs. The most challenging part of the build was, probably as expected, getting the model to stand on its own two feet. It does – and with full articulation – but I did end up making a stand for it, since displaying it by itself was too scary.

AT-ST - Back
For this MOC, I also attempted to work the Technic required to hold it together into the overall design and shape, and not just as greebling or hiding it.

AT-ST - Head Right
Weapons! Everyone likes complicated guns, right? The main gun was a challenge, because of all the little cylinders on it. Binoculars solved that well, I think. One of the things I don’t like about some AT-STs (my previous Midi-scale included) is that the concussion grenade launcher is too big, so I attempted to get that right in this model.

AT-ST - Head Left
The repeating guns on the side were a little troublesome as well; I still think they’re a little bulky.

AT-ST - Head Rear
I love this shot. The hoses and shapes on the back of the ‘head’ work so well together.

AT-ST - Top
One thing a lot of people I’ve talked to assume about the AT-ST is that the cockpit hatch opens to the back. Actually, it opens to the side. To make things more difficult, I decided that a 3-wide hatch was the right size.

AT-ST - Say 'Hi!'
Full interior, of course. Seats two, comfortably. No shots of the whole interior at the time, but I’ll probably take some eventually.

AT-ST - Rear End
This was one of my favorite parts to work on. I see all those great cheese slope mosaics others do, but I’ve never previously had a chance to do something like that myself. No, they’re not all attached. Most are, but six are held in only by friction.

AT-ST - Hip Joint
This is probably the only place where I strayed from the basic design of the studio model. Instead of the leg rotating on a piece attached to a hinge, I went with a ball joint, which was much stronger than any of the other LEGO assemblies I could come up with.

AT-ST - Legs
Very tough, these. If you ever desire a feeling of intense satisfaction with an MOC, go build something that has to hold up a chunk of heavy SNOT with two legs that include multiple joints and have to be skinny and detailed. If you’ve never done a fist pump before, you will do one when you get it to stand up on its own.

AT-ST - Feet
Not totally satisfied with these. Couldn’t find anything good for the fence cutters other than these, which lots of people use but are a bit on the small side.

AT-ST - Greebling
This is the only point in this vehicle where one can really greeble. Of note, there are two unusual parts usage here: the ‘neck’ is an inside-out rubber tire, and there’s a samurai helmet in the greebles.

Much credit and inspiration is due to marshall banana. Source material I worked with can be found here